JSBridge 原理及具体实现
Jan 6, 2023Front End
在 Hybrid 应用开发中,JSBridge 提供了 WebView 和 Native 之间互相通信的能力,使得前端网页可以调用平台相关的 API,Native 也可以操作前端网页。JSBridge 如同一座桥连接了 WebView 和 Native,如果没有 JSBridge,Hybrid 开发的应用不过是一个小号浏览器。实际上,我们也可以把浏览器向网页提供的各种 API (如 navigator.clipboard, navigator.bluetooth)当作一种 JSBridge,因为本质上 JS 也是通过它们和 Native 进行了通信。
受限于浏览器的 API 支持情况,基本所有需要任何 Native 操作的应用都不可能使用纯网页开发。因此,Hybrid 应用为了在 Web 端实现 Native 操作的能力,需要利用平台提供的 WebView API 手动实现 JSBridge。同时,平台(iOS、Android、Windows)差异是客观存在的,不同的平台所内置的 WebView 引擎不一致,提供的 WebView API 也不一致,因此,JSBridge 的具体实现还与平台有关。
实现前提
WebView 和 Native 通信有两个过程,一个是从 WebView 到 Native,另一个则相反。
Native 到 WebView
Native 可以操控 WebView 加载特定 URL 的网页,因此可以将某些参数拼接到 URL Query String 或 Hash 串中,JS 可以解析 URL 拿到参数,但这种方式只能在加载网页时传递一次消息。平台一般都会提供在 WebView 中执行一段 JS 代码的 API (evaluateJavascript),利用这个 API,Native 可以直接调用网页端 JS 函数,或者直接操作 DOM 和 BOM。
WebView 到 Native
根据 WebView 的常见开放能力,WebView 向 Native 发送通知的方式就比较多了。
首先,WebView 容器有一层网络拦截层,网页发起的任何请求都会经过这里,Native 可以通过相关 API 注册拦截处理函数,从而获取到网页发出的消息。并且不仅仅是标准协议(http://, https://, socket://),私有协议同样会被拦截,我们可以指定一个私有协议(如:jsbridge://),将所有 WebView 到 Native 的通信操作都使用该协议来发送请求,这有点像 RPC 的 Client 端请求过程(除了没有响应)。
同时,Native 还可以向 WebView 容器注入原生 API,将其挂在到 window 变量上,JS 可以直接调用。例如 Electron 提供的 ipcRenderer。
具体实现
以下实现中使用 Rust 作为 Native 端,如果不会 Rust,可以只参考 JS 端来了解大致的实现原理。
准备工作
如不了解 Rust,该小节可以跳过。
wry 是一个跨平台的 WebView 渲染库,它封装了多个平台的 WebView 并向外提供了统一的操作 API。我们通过它创建一个 WebView 窗口并加载前端网页,该段代码可以在 wry 的 官方文档 找到更详细的说明。
// rust
use std::cell::RefCell;
use std::collections::HashMap;

use wry::application::event::{Event, StartCause, WindowEvent};
use wry::application::window::WindowId;
use wry::webview::WebView;
use wry::{
    application::{
        event_loop::{ControlFlow, EventLoop},
        window::WindowBuilder,
    },
    webview::WebViewBuilder,
};

thread_local! {
    static WEBVIEWS: RefCell<HashMap<WindowId, WebView>> = RefCell::new(HashMap::new());
}

fn main() -> wry::Result<()> {
    let event_loop = EventLoop::new();
    let window = WindowBuilder::new()
        .with_title("An Implementation of JsBridge")
        .build(&event_loop)?;
    let id = window.id().clone();
    // `http://127.0.0.1:5173/` 是我本地临时起的 Web 服务
    let webview = WebViewBuilder::new(window)?
        .with_url("http://127.0.0.1:5173/")?
        .build()?;
    webview.open_devtools();
    WEBVIEWS.with(move |webviews| {
        webviews.borrow_mut().insert(id, webview);
    });
    event_loop.run(move |event, _, control_flow| {
        *control_flow = ControlFlow::Wait;
        match event {
            Event::NewEvents(StartCause::Init) => println!("Wry has started!"),
            Event::WindowEvent {
                event: WindowEvent::CloseRequested,
                ..
            } => *control_flow = ControlFlow::Exit,
            _ => (),
        }
    });
}
基本的通信
wry 在 WebView 容器内的网页向 window 变量注入了原生 API 以提供 JS 向 Native 发送消息的能力(其他语言可以和这个类比),该 API 长这个样子:
interface Window {
  ipc: {
    postMessage: (msg: string) => void,
  }
}
interface Window {
  ipc: {
    postMessage: (msg: string) => void,
  }
}
函数
ipc.postMessage所接受的参数为一个字符串,这是因为与语言实现相关的 JS 数据类型并不能被另一种语言使用,语言之间想要传递数据需要进行序列化和反序列化操作,而字符串的字节数据可以很好的进行序列化存储,以及反序列化恢复为语言相关的类型数据。在这里 JS 可以将对象序列化为 JSON 字符串,以字节的形式传递给 Rust,Rust 可以(利用 serde 和 serde_json)将 JSON 字符串的字节数据转换为对应结构体。
JS 通过该方法向 Native 传递消息,我们为 WebView 接收到 IPC 消息的事件注册处理函数:
// rust
// WebViewBuilder 结构体提供了 `with_ipc_handler` 以注册 IPC 回调
let webview = WebViewBuilder::new(window)?
    .with_url("http://127.0.0.1:5173/")?
    .with_ipc_handler(move |window, msg| {
        handle_ipc_msg(msg);
    })
    .build()?;

// 直接将收到的数据打印出来
pub fn handle_ipc_msg(msg: String) {
    println!("IPC MSG: {}", msg);
}
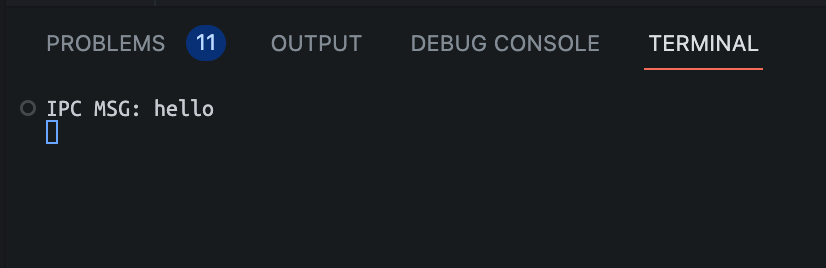
我们尝试使用 JS 向 Native 发送消息:
// ts
window.ipc.postMessage('hello')
// ts
window.ipc.postMessage('hello')
没有问题!
WebView 到 Native 的路已经打通,接下来我们需要为 Native 提供向 WebView 通信的功能,将一个函数挂载到 window 中:
// ts
window.onReceivedMsg = (msg: string) => {
  console.log('onReceivedMsg', msg)
}
// ts
window.onReceivedMsg = (msg: string) => {
  console.log('onReceivedMsg', msg)
}
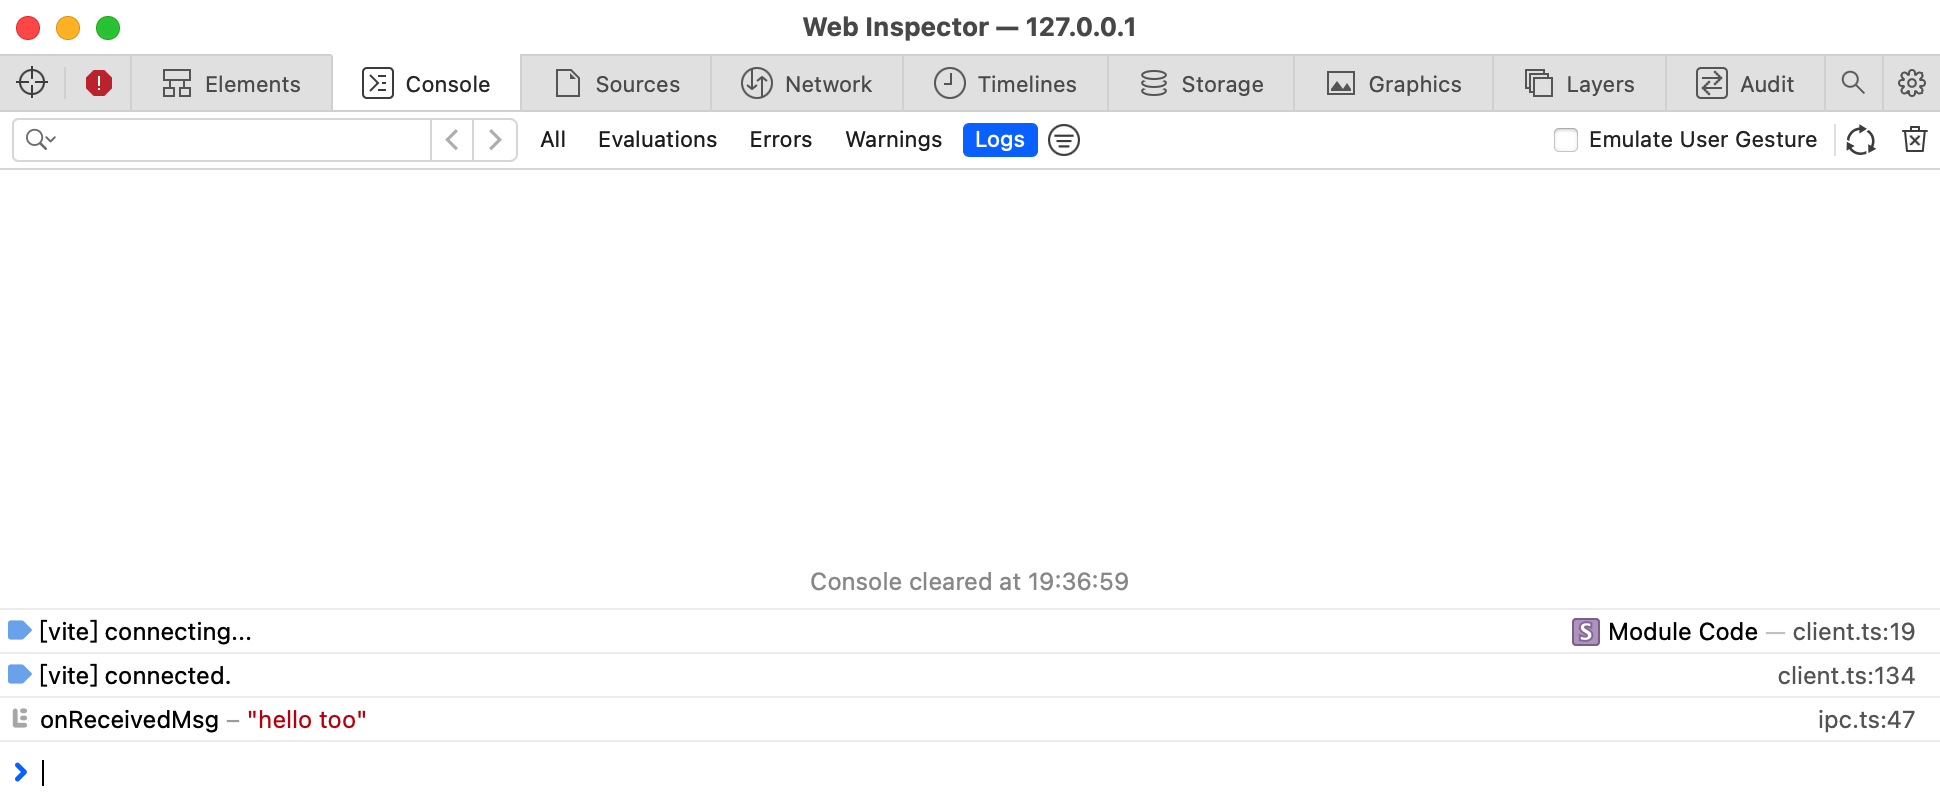
然后我们在 Native 端通过 evaluateJavascript API 直接调用。
// rust
webview.evaluate_script("window.onReceivedMsg('hello too')");

// 这和在 JS 环境直接运行下面的代码效果完全一致
// window.onReceivedMsg('hello too')
// rust
webview.evaluate_script("window.onReceivedMsg('hello too')");

// 这和在 JS 环境直接运行下面的代码效果完全一致
// window.onReceivedMsg('hello too')
也没有问题!
这样,WebView 与 Native 之间的最基本的消息通信已经实现了,以此为基础可以实现任何 WebView 和 Native 的 API 互相调用的功能。
响应和回调
WebView 与 Native 之间的调用往往需要响应结果,并且还有一个与之对应的回调函数来消费该响应结果。为了实现 WebView 调用 Native API 后可以接收并处理响应,我们可以这么做:
JS 调用 postMessage 前,将一个回调函数存在一个容器中,并将该函数的句柄(callbackId)一同发送给 Native,等到 Native 处理完成所有操作时,通过 evaluateJavascript 运行 onReceivedMsg 并传递函数句柄,onReceivedMsg 则从容器中找到该函数并调用,简单的实现是这样的:
// ts
type Fn = (...params: any[]) => void

const CALLBACK_BUCKET = new Map<number, Fn>()

let callbackId = Number.MIN_SAFE_INTEGER

const invoke = (params: string, cb?: Fn) => {
  if (cb) {
    // 将回调函数存起来
    CALLBACK_BUCKET.set(callbackId++, cb)
  }
  // 将 params 和 callbackId 一同传递给 Native,需要序列化成字符串
  window
    .ipc
    .postMessage(JSON.stringify({
      params,
      callbackId: cb ? callbackId : undefined
    }))
}

interface ReceivedMsg {
  data: any,
  callbackId?: number,
}

window.onReceivedMsg = ({ data, callbackId }: ReceivedMsg) => {
  if (callbackId) {
    // 拿到 Native 传过来的 callbackId,就能找到对应的回调函数去执行
    CALLBACK_BUCKET.get(callbackId)?.(data)
    // 处理完成后从容器删除回调函数
    CALLBACK_BUCKET.delete(callbackId)
  }
}
// rust
use serde::Deserialize;
use serde_json::json;

#[derive(Deserialize, Debug)]
#[serde(rename_all = "camelCase")]
struct MessagePayload {
    params: String,
    callback_id: Option<isize>,
}

// 修改 handle_ipc_msg 函数
fn handle_ipc_msg(
    msg: String,
    webview: &WebView
) -> Result<(), Box<dyn Error>> {
    // 我们利用 serde 和 serde_json 将 JSON 字节数据反序列化成 Rust 结构体
    if let Ok(payload) = serde_json::from_str::<MessagePayload>(&msg) {
        let data = do_something(payload.params);
        // `evaluateScript` 传递回调函数的句柄
        webview.evaluateScript(&format!(
            "window.onReceivedMsg({})",
            json!({
                "callbackId": payload.callback_id,
                "data": payload.params + "world!",
            })
        ))
    }
    Ok(())
}
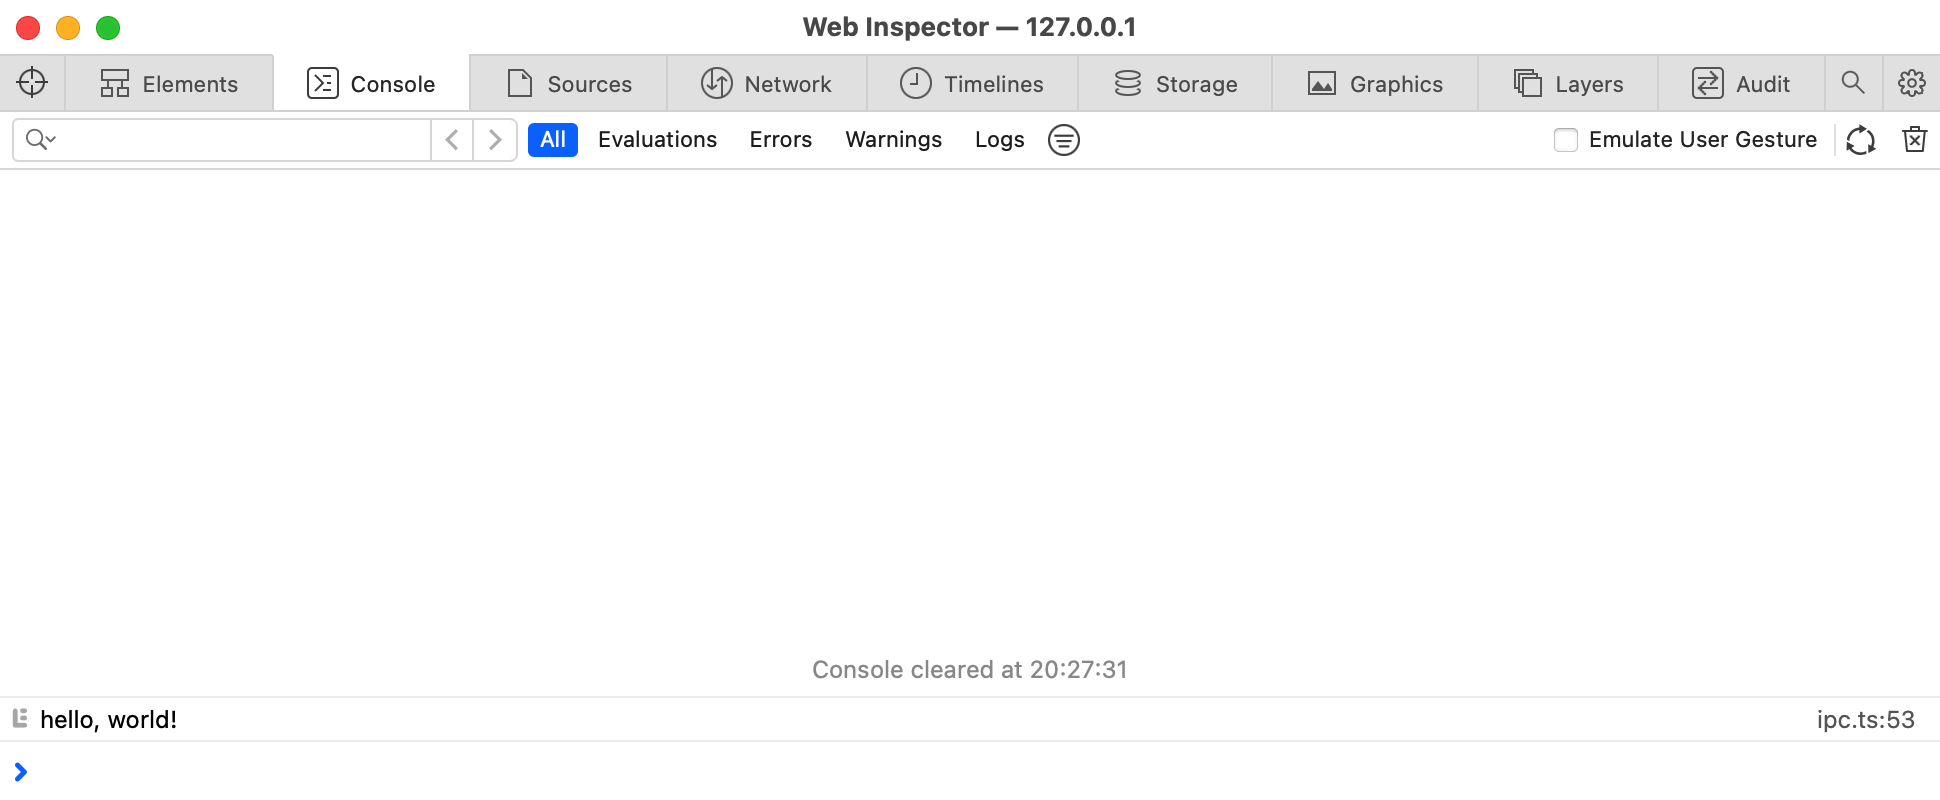
我们简单的向 Native 发送字符串 hello, 作为参数,然后 Native 会拼接上 world! 作为响应,最后回调函数直接打印出来。
// ts
invoke('hello, ', console.log)
// ts
invoke('hello, ', console.log)
完美,符合预期!
多次响应和回调
在某些 WebView 调用 Native API 的情况,Native 可能会多次返回响应数据,而 WebView 也需要进行多次接收并处理。假设以下场景:
Native 提供了一个下载资源的 API,WebView 调用后需要回调下载进度改变、下载成功、下载失败和下载结束事件,这些回调都发生在同一个 Native 接口调用中。这时,除了触发下载的动作是 WebView 主动发出外,其余事件都由 Native 端决定,WebView 是完全无法控制的。WebView 可以主动的去发送 IPC 消息去轮询进度,但这种做法不仅增加无用花销,还需要 Native 去维护数据的共享问题,增加内存安全隐患(虽然 Rust 极度内存安全)。
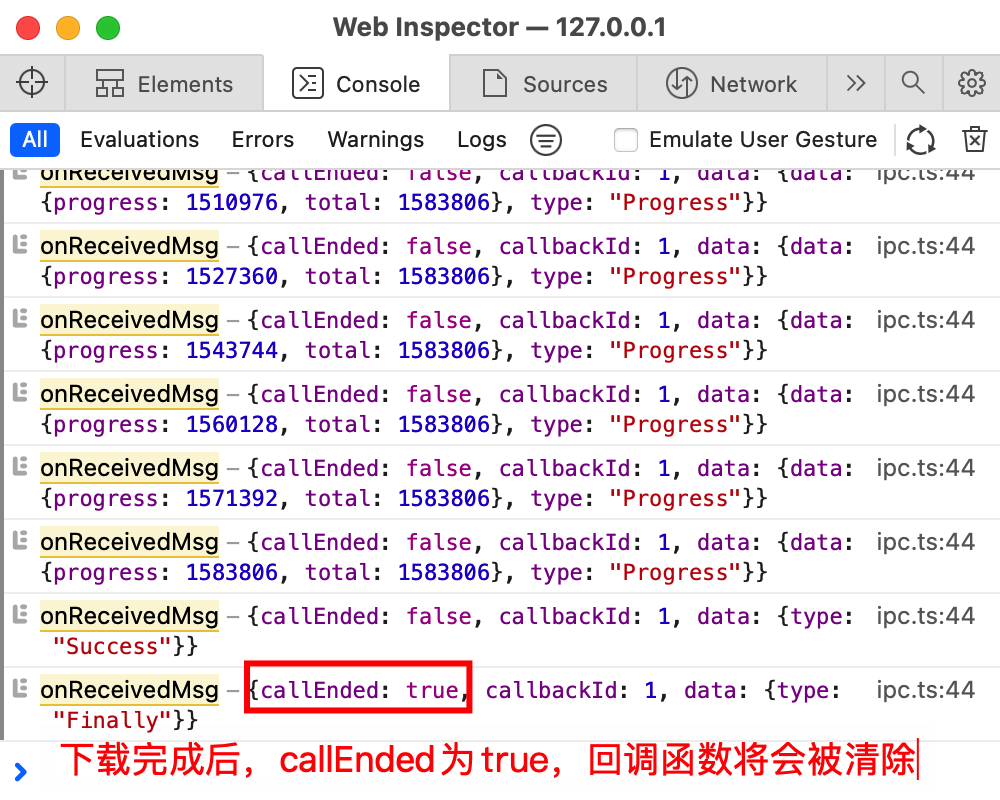
一个有效且实用的做法是:只注册一个回调函数,Native 可以多次调用,并在不同的状态下给回调函数传递不同的响应,回调函数可以依据响应进行不同的操作,当 Native 最后一次调用回调函数时,回调函数从容器中删除。因此,Native 在执行 evaluateJavascript 时不仅需要按情况给回调函数传递响应,还需要传递一个 是否是最后一次调用 的标志 callEnded,JS 以此来判断是否应该清理回调函数。
我们封装一下 JS 调用 Native 下载 API 的方法:
// ts
enum CallbackType {
  Progress = 'onProgress',
  Success = 'onSuccess',
  Fail = 'onFail',
  Finally = 'onFinally',
}

interface DownloadConfig {
  url: string,
  [CallbackType.Progress]?: (data: { total: number, progress: number }) => void,
  [CallbackType.Success]?: () => void,
  [CallbackType.Fail]?: () => void,
  [CallbackType.Finally]?: () => void,
}

const download = (config: DownloadConfig) {
  invoke(
    config.url,
    ({ type, data }: { type: keyof typeof CallbackType, data: any }) => {
      // type 为 'Progress' | 'Success' | 'Fail' | 'Finally'
      config[CallbackType[type]]?.(data)
    }
  )
}

// 同时需要修改一下 onReceivedMsg
window.onReceivedMsg = ({ data, callbackId, callEnded }: ReceivedMsg) => {
  // 打印一下 received msg
  console.log('onReceivedMsg', { data, callbackId, callEnded })
  if (callbackId) {
    const cb = CALLBACK_BUCKET.get(callbackId)?.(data)
    if (cb) cb(data)
    // 如果是最后一次调用,从容器删除回调函数
    if (callEnded) CALLBACK_BUCKET.delete(callbackId)
  }
}
我们在 Native 增加一个下载函数:
// rust
use std::{fs, io::Write, path};

use futures::StreamExt;
use reqwest::IntoUrl;

pub async fn download<T: IntoUrl>(
    url: T,
    on_progress: impl Fn(u64, u64) -> (),
) -> Result<(), Box<dyn std::error::Error>> {
    let path = path::Path::new("./downloads/temp.png");
    fs::remove_file(path).ok();
    let mut f = fs::OpenOptions::new().write(true).create(true).open(path)?;
    // 使用第三方库 reqwest 来发送 http 请求
    let res = reqwest::get(url).await?;
    let total = res.content_length().unwrap_or(0);
    let mut stream = res.bytes_stream();
    let mut progress: u64 = 0;
    // 通过字节流的方式取得响应,并将响应的 chunk 追加写入文件中
    // 同时字节流的每一次更新都是一次下载进度的变化,调用闭包 `on_progress` 通知进度变化了
    while let Some(chunk) = stream.next().await {
        if let Ok(chunk) = chunk {
            progress = progress + chunk.len() as u64;
            f.write(&chunk)?;
            on_progress(progress, total);
        } else {
            break;
        }
    }
    Ok(())
}
同时修改 Native 端处理 IPC 消息的 handle_ipc_msg 函数:
// rust
#[derive(Deserialize, Debug)]
#[serde(rename_all = "camelCase")]
struct MessagePayload {
    params: String,
    callback_id: isize,
}

#[derive(Serialize, Clone)]
enum CallbackType {
    Progress(u64, u64),
    Success,
    Fail(String),
    Finally,
}

impl CallbackType {
    fn to_json(self) -> serde_json::Value {
        match self {
            CallbackType::Progress(progress, total) => {
                json!({ "type": "Progress", "data": { "total": total.clone(), "progress": progress.clone() } })
            }
            CallbackType::Fail(err) => {
                json!({ "type": "Fail", "data": err })
            }
            _ => json!({ "type": self }),
        }
    }
}

// !!!注意:
// !!!以下代码是有问题的,因为这里使用了 tokio 绿色线程去调用 download 函数, 而闭包使用了 webview 的引用
// !!!由于 `Rc<wry::application::window::Window>` ( `WebView` 的 `window` 属性) 没有实现 Send, Sync 等 Trait 导致编译不成功
// !!!由于篇幅有限,重构正常后的代码请查看 Git 仓库:https://github.com/WayneWu98/jsbridge-in-rust

// fn handle_ipc_msg(....) {
// ...
    if let Ok(MessagePayload { params, callback_id }) = serde_json::from_str(&msg) {
        let notice = |callback_type, callEnded| {
            webview.evaluateScript(&format!(
                "window.onReceivedMsg({})",
                json!({
                    "callbackId": callback_id,
                    "data": callback_type.to_json(),
                    "callEnded": callEnded,
                })
            ));
        }
        // 使用 tokio 执行异步下载任务
        tokio::spawn(async move {
            let err = download(url, |progress, total| {
                notice(CallbackType::Progress(progress, total), false);
            })
            .await
            .err();
            if let Some(err) = err {
                notice(CallbackType::Fail(err.to_string()), false);
            } else {
                notice(CallbackType::Success, false);
            }
            notice(CallbackType::Finally, true);
        });
    }
// ...
// }
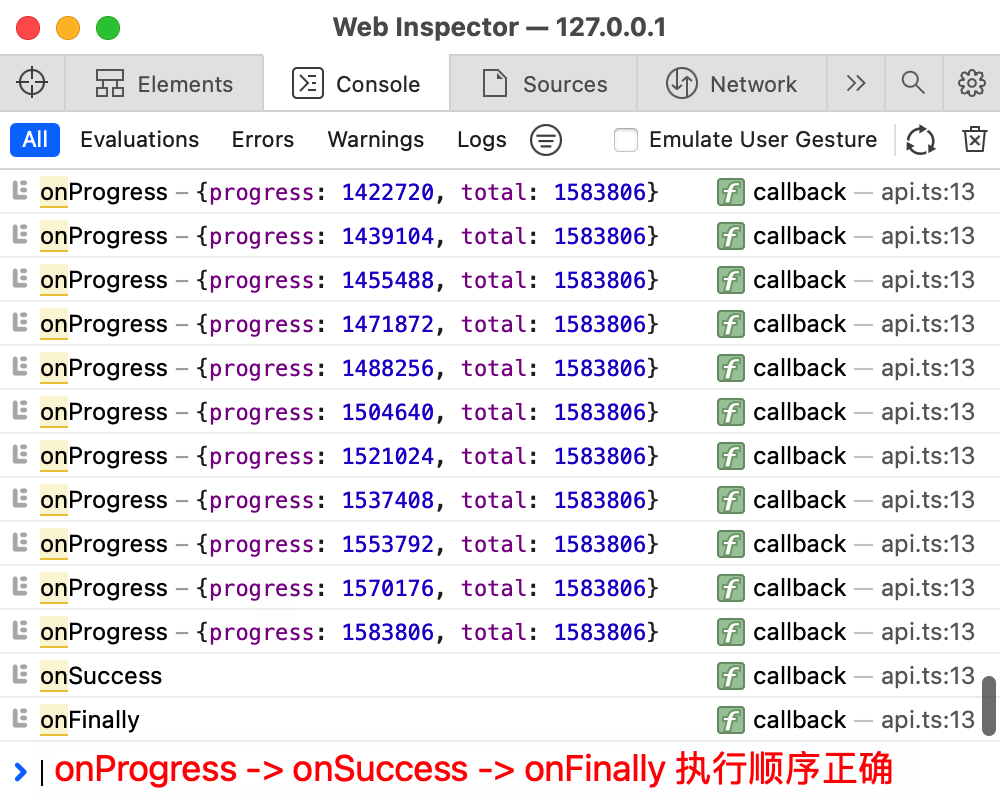
我们通过以下方式进行调用,对 unsplash 的一张图片进行下载:
// ts
const url = 'https://plus.unsplash.com/premium_photo-1666976923529-f0366d02d726?ixlib=rb-4.0.3&ixid=MnwxMjA3fDB8MHxwaG90by1wYWdlfHx8fGVufDB8fHx8&auto=format&fit=crop&w=3871&q=80'
download({
  url,
  onProgress: (params) => console.log('onProgress', params),
  onSuccess: () => console.log('onSuccess'),
  onFinally: () => console.log('onFinally'),
})
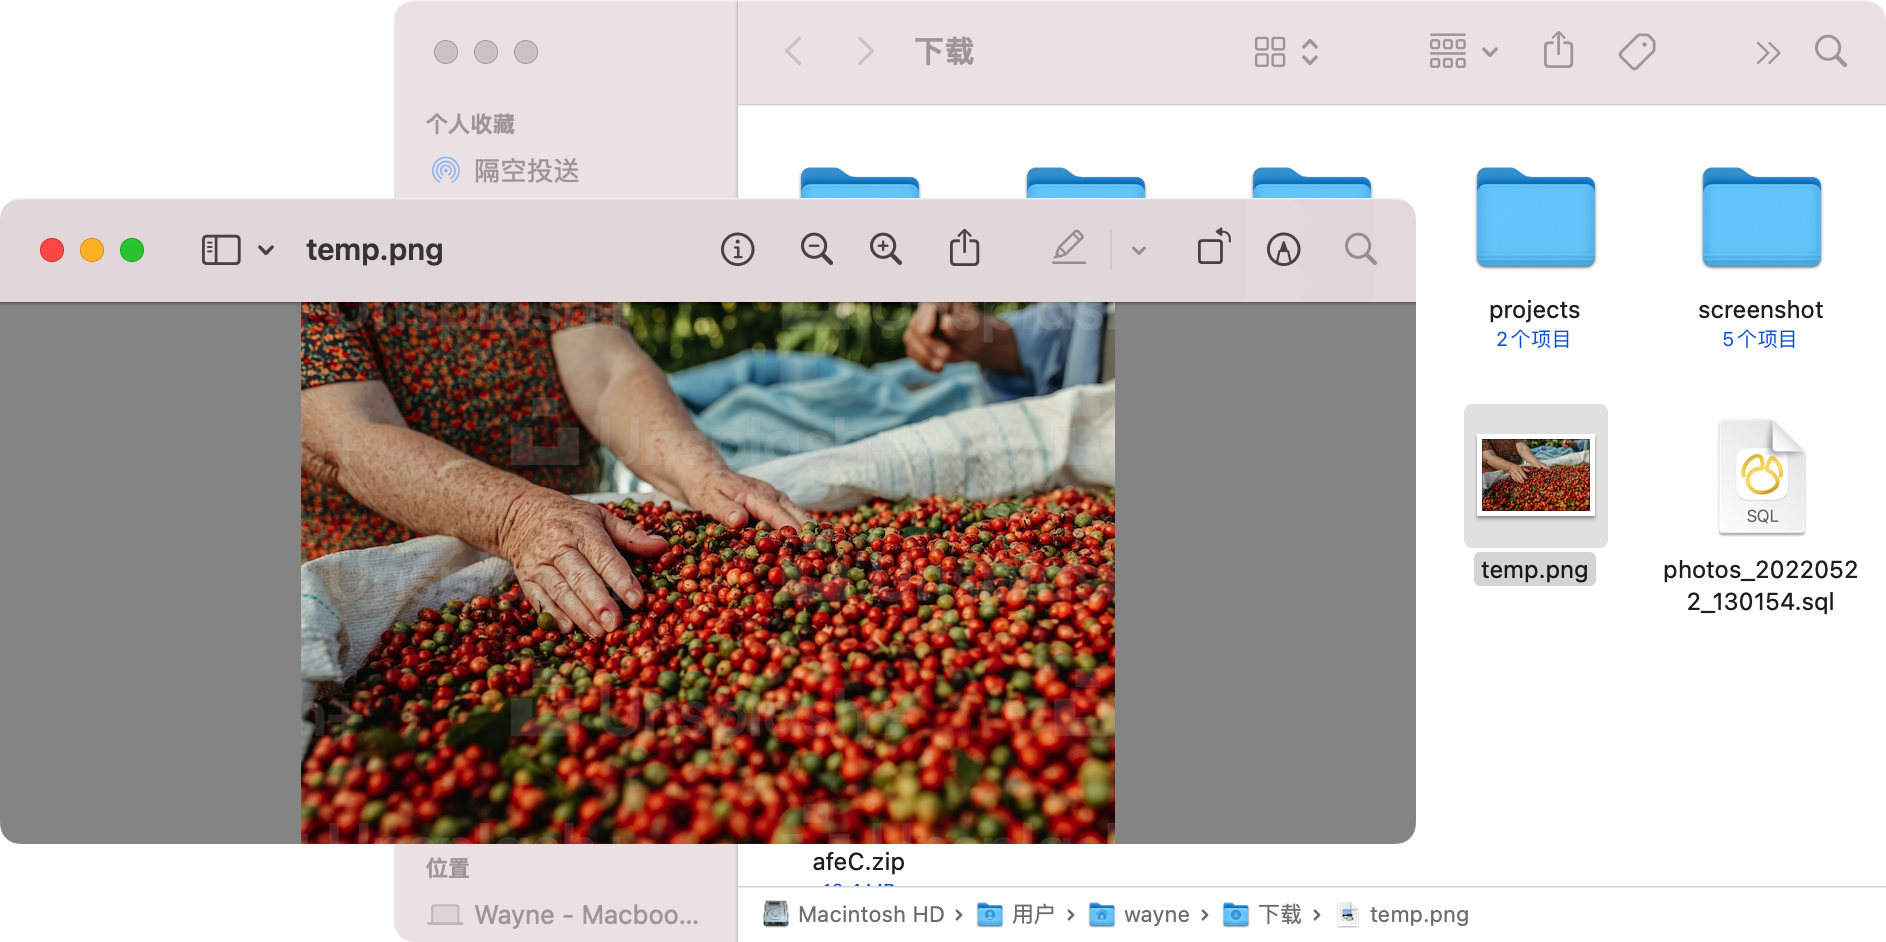
让我们看一下运行结果,Perfect!!!非常完美。回调函数按预期执行,同时图片成功下载到了本地:
WebView 监听事件
除了 WebView 主动调用 Native API 外,Native 也有可能主动向 WebView 发送消息,WebView 需要注册回调函数来监听这些消息,在合适的时机才会被动执行。如:WebView 可能需要监听设备的 WiFi、白天/黑暗模式、键盘高度的变化等事件。这种实现起来就简单得多:
// ts
type Fn = (...params: any[]) => void

enum Event {
  // ...
}

// 创建一个容器存放事件监听函数
const EVENT_HANDLER_BUCKET = new Map<Event, Set<Fn>>()

// 使用 on 注册监听函数
const on = (event: Event, fn: Fn) => {
  const handlers = EVENT_HANDLER_BUCKET.get(event)
  if (handlers) return void handlers.add(fn)
  EVENT_HANDLER_BUCKET.set(event, new Set([fn]))
}

// 使用 off 取消监听
const off = (event: Event, fn: Fn) => {
  EVENT_HANDLER_BUCKET.get(event)?.delete(fn)
}

interface ReceivedMsg {
  data: any,
  callbackId?: number,
  event?: Event
}

window.onReceivedMsg = ({ data, callbackId, event }: ReceivedMsg) => {
  // callbackId, event 同时只有一个
  // callbackId 是处理 WebView 主动调用 Native API 的回调
  // event 是 Native 主动通知 WebView 的事件监听
  if (callbackId) {
    // ...
  } else if (event) {
    const handlers = EVENT_HANDLER_BUCKET.get(event)
    for (const handler of Array.from(handlers ?? []) ) {
      if (handler) handler(data)
    }
  }
}
Native 端只需要这么通知 WebView 即可:
// rust
// 下面的代码会使监听 "ThemeChanged" 事件的 JS 函数被调用
webview.evaluateJavascript("window.onReceivedMsg({ event: \"ThemeChanged\", data: \"dark\" })");
// rust
// 下面的代码会使监听 "ThemeChanged" 事件的 JS 函数被调用
webview.evaluateJavascript("window.onReceivedMsg({ event: \"ThemeChanged\", data: \"dark\" })");
我们以此来实现 WebView 监听设备主题切换事件的功能,并将当前设备主题打印出来,在这里 wry 重导出的 TAO 库的 event_loop 提供了支持:
// rust
// 还记得 event_loop 吗,可以回看前面的准备工作,不了解也没关系

use wry::application::window::Theme;

event_loop.run(move |event, _, control_flow| {
    *control_flow = ControlFlow::Wait;
    match event {
        // ...
        Event::WindowEvent {
            event: WindowEvent::ThemeChanged(theme),
            ..
        } => {
            webview.evaluate(
                format!(
                    "window.onReceivedMsg({})",
                    json!({
                        "event": "ThemeChanged",
                        "data": if let Theme::Dark = theme {
                            "dark"
                        } else {
                            "light"
                        }
                    })
                )
            )
        },
        // ...
    }
});
我们注册监听函数:
on('ThemeChanged', (theme: string) => console.log('ThemeChanged', theme))
on('ThemeChanged', (theme: string) => console.log('ThemeChanged', theme))
看一下运行结果,没有问题!
未完善的功能
到这里,我们已经实现了 JSBridge 的核心功能,并且进行了几个具体案例的实践,但实际上这个 JSBridge 只能算半个实现。整理一下(WebView)已经实现的场景:
- WebView 调用 Native API;
- WebView 调用 Native API 需要返回值;
- WebView 调用 Native API 可能有多次响应需要处理;
- WebView 监听 Native 事件。
很显然,当 Native 作为主动方时,以上场景同样存在:Native 调用 WebView API 时需要返回值;多次响应返回值;监听 WebView 网页事件。实际上,只有 Native 接收返回值的场景我们还没有实现。在某些平台或 WebView 绑定库中,evaluateJavascript API 会将 JS 的运行结果返回或者提供回调,但碰巧 wry 暂时还没有支持这个特性,这里就不做实现了。
结语
一个完整的 JSBridge 不仅需要针对平台做兼容,还需要对各种基础 API 进行更上层的封装,以供 Hybrid 应用开发使用,实际实现更为复杂,这里仅仅做了最基础的原理实践。
JSBridge 是针对 JS 提供连接 Native 的桥梁(广义上也有 PythonBridge、RubyBridge),其原理并不复杂,最核心的部分是 Native 和 WebView 之间的跨进程/线程通信,同时通信数据需要进行(反)序列化操作,两者会都会增加运行时花销,并且涉及 JSBridge 通信的 API 调用往往是异步的。
完整代码已经上传到 Github 项目 jsbridge-in-rust,可以到 Github 查看更为具体的代码实现。